How to Lace Soccer Cleats
When it comes to lacing
The key is to find a method that works best for you and your playing style.
In this article, we will explore various methods for lacing
Read this guide to lace your cleats up like a true pro!
Preparing Your Cleats for Lacing
 Loosening the Laces
Before lacing your
Start at the top of the cleat and work your way down, gently pulling on each section of the lace to loosen it.
This will help prevent any discomfort or pressure points when you start lacing up your cleats.
Adjusting the Tongue 👅
Make sure the tongue of your cleat is centered before lacing up.
If the tongue is off-center, it can cause discomfort or even lead to injury during play.
To adjust the tongue, simply use your fingers to center it over the top of your foot. Easy enough.
Positioning Your Foot
When lacing up your
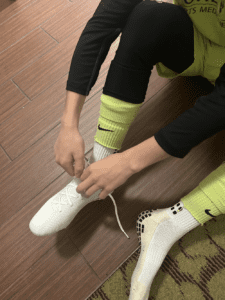
- Start by placing your foot into the cleat and making sure your heel is snugly in place.
- Adjust the tongue as needed and pull the laces tight, making sure they are evenly distributed on both sides of the cleat.
- Tie the laces securely to ensure a snug fit. We’ll introduce the different ways in the next section.
As you play in your cleats, remember to check the fit of them regularly and adjust the laces as needed to prevent discomfort or injury during play.
Lacing Your Cleats
There are several lacing techniques that players can use to customize the fit of their cleats.
This section will cover three of the most commonly used techniques: Standard Lacing, Loop Lacing, and Heel Lock Lacing.
Standard Lacing Technique
The Standard Lacing Technique is the most common way to lace
- Begin by threading the laces through the bottom holes of the cleats, making sure that both sides are even in length.
- Cross the laces over each other and thread them through the next set of holes, pulling them tight as you go.
- Continue this pattern until you reach the top of the cleat, making sure to pull the laces tight each time you thread them through a hole.
- Once you reach the top, tie the laces in a knot to secure them in place.
Loop Lacing Technique
The Loop Lacing Technique is ideal for players who want a more customized fit around the middle of the foot.
- Begin by threading the laces through the bottom holes of the cleats, making sure that both sides are even in length.
- Instead of crossing the laces over each other, thread them through the next set of holes on the same side of the cleat.
- Loop the laces back through the same hole, creating a loop around the midfoot.
- Continue this pattern until you reach the top of the cleat, tying the laces in a knot to secure them in place.
Heel Lock Lacing Technique
The Heel Lock Lacing Technique is ideal for players who experience heel slippage while playing.
- Begin by threading the laces through the bottom holes of the cleats, making sure that both sides are even in length.
- Cross the laces over each other and thread them through the next set of holes.
- Instead of continuing the criss-cross pattern, thread each lace through the loop created by the other lace on the opposite side of the cleat.
- Continue this pattern until you reach the top of the cleat, tying the laces in a knot to secure them in place.
Video of Lacing Techniques
If you are a more visual learner, check out this helpful video by Unisport.
Adjusting Your Laces for Comfort & Performance
Checking for Tightness
One of the most important aspects of lacing
To check for tightness, the player should stand up and wiggle their toes. If the toes can move freely, the laces are not too tight. If the toes are cramped or cannot move at all, the laces may be too tight (assuming the actual cleat is not) and need to be adjusted.
Adjusting for Width and Arch Support
Players with wider feet or higher arches may need to adjust their laces for a more comfortable fit.
To adjust for width, the player can skip one or two holes near the middle of the shoe to create more space.
To adjust for arch support, the player can use a crisscross pattern that tightens the laces around the arch of the foot. This will provide extra support and prevent the foot from sliding around inside the shoe.
Taping for Extra Support
For players who need extra support, taping the foot can be an effective solution.
To tape the foot, the player should wrap athletic tape around the arch and heel of the foot, pulling it snugly but not too tight. This will provide extra support and help prevent foot injuries. It is important to note that taping should not be used as a substitute for proper fitting cleats and lacing techniques.
Conclusion
Properly lacing up and tying your cleats is an overlooked step in preparing for training or games.
A soccer cleat that is too loose can cause players to twist their ankles or experience a random foot injury. On the other hand, if they are too tight, players may experience pain on the top of their foot.
I know it sounds elementary but getting in the groove of lacing your boots up correctly can be advantageous for a player.
If you’d like to learn more about proper ‘cleat care’, check out How Should Soccer Cleats Fit, How to Break in Cleats, and Types of Soccer Cleats.

Written By: SoccerNovo
SoccerNovo is an independent youth soccer media brand built to help parents, players, and coaches better understand the game and the pathways available in U.S. soccer. Our mission is to make youth soccer simpler, clearer, and more accessible for everyone involved in it.
Let’s connect


